Mold designers need to pay attention to some details of mold structure and part design. Details determine success or failure. Of course attention to detail requires level and experience. Don’t worry, this article contains 12 general details. Get these details to help your design.
1.Never ignore chamfers.
(1) Non-formed parts should avoid sharp edges.
The parts have sharp corners or sharp edges, and the parts are easy to collapse when nitriding. The absence of an R angle creates processing stress. Parts will fail prematurely. If the core or cavity is not set chamfer. This can cause resistance during injection molding.
(2) There is no standard for chamfer.
The chamfers of the template are uniform and look beautiful. Depending on the size of the template, use different chamfers.
(3) The assembly of parts should be set chamfer.
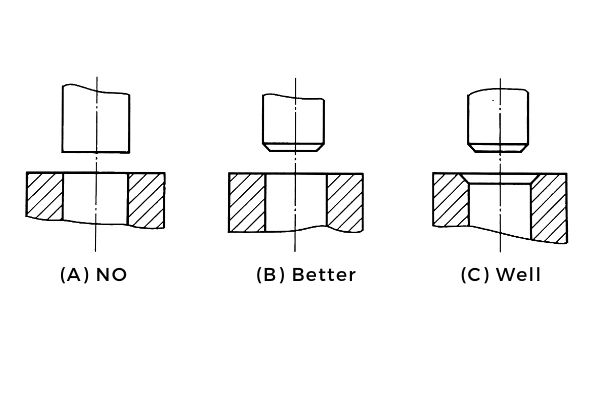
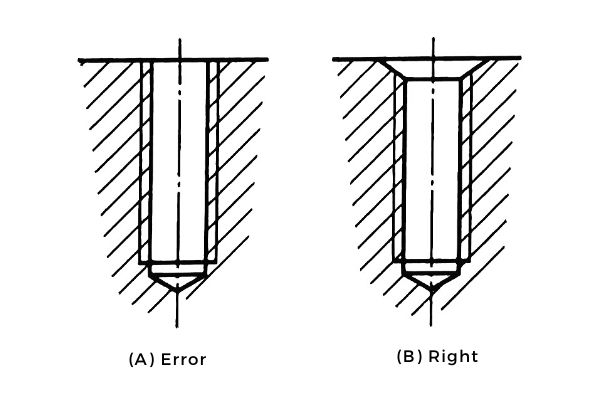
Assembly holes for parts and heads for shaft-type parts. A suitable chamfer is required. This facilitates assembly and is less prone to damage. And it is easy to knock the dowel pin into the assembly part. As the picture shows.
2.Design the holes correctly.
(1) Avoid breaking the edges of the holes.
A.The edges of the hole and the wear block are broken.
B.There must be a certain distance between the holes. The margin should be at least 3-6mm.
C.Avoid placing the cooling water holes too close to the tapped holes. Eyelet holes to avoid interference with water pipe joint holes.
D.There is a gap between the cooling water hole and the cooling water hole.
E.The hole should not be too close to the outside of the part.
F.There should be a gap between the cooling water hole and the ejector hole.
(2) Hole diameter of the screw.
The diameter of the via of the hexagon socket screw cannot be too large. Otherwise, the contact area of the screw plane will be reduced.
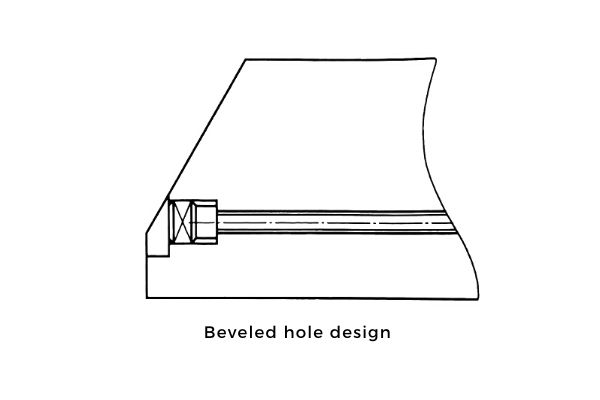
(3) Water pipe thread on bevel.
If the bevel has threaded holes, be sure to make a plane on the bevel. as the picture shows. If you drill directly on the inclined surface. The drill and tap will easily break and damage the workpiece.
(4) Design of cooling water holes intersecting in the same plane.
Cooling water holes that intersect in the same plane. One hole must be more than half the diameter of the bottom of the other hole. In particular, avoid the intersection of the bottom ends of the two holes. Otherwise, the drill is easily broken when punching, as shown in Figure (a). Figure (b) is correct.
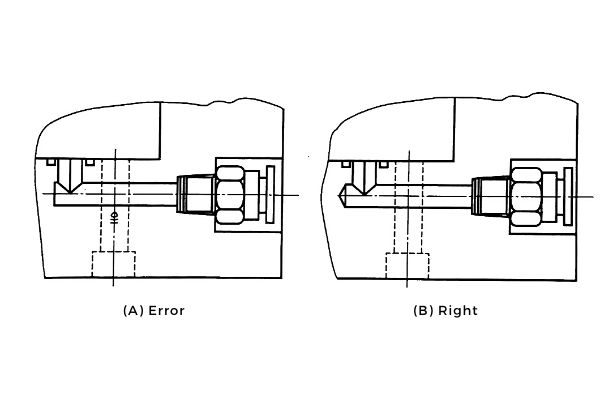
(5) Cooling water hole.
5)The 3D shape of the head of the cooling water hole must not be flat. It is wrong as shown in Figure (a). It should be designed with a sharp angle of 120 °. As shown in Figure (b).
3.Improperly designed screws and nuts.
1)Arrange the screws near the part where the joint is most stressed.
2)The countersunk holes of the hexagon socket screws are required to be uniform and meet the standards.
3)The mechanism for preventing the nut of the rotating mechanism from loosening should be reliable.
4)The effective depth of the tapped hole must exceed the length that the screw needs to be screwed in. Generally the effective length of the screw is 1.5-2 times the diameter of the screw.
5)The eyebolts must not interfere with other parts. Allow sufficient space for the nuts to be tightened. Ensure space for bolt installation and removal.
4.Set the screws for the eyebolts.
1.Eyebolt screw holes should be chamfered. as the picture shows. The screws are not close to the template, and there is a gap on the plane. The screws are bent during lifting, which poses a hidden danger.
2.Set the position of the eyebolt reasonably. Pay attention to the center of gravity of the mold after lifting.
3.When mounting the die, the die upward only 5 °. Otherwise, the mold installation is difficult.
4.Consider the allowable load of eye bolts.
5. Set the dowel pins correctly.
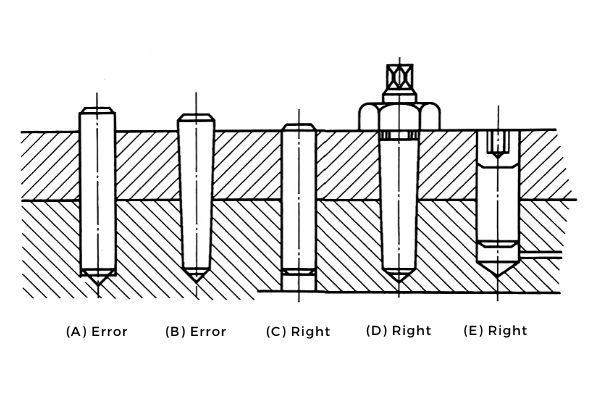
1.Parts assembled with each other must have two dowel pins of appropriate size. Cannot be replaced with screws.
2.The distance between the two dowel pins should not be too close. The positioning pins and hex screws should be staggered, so as to obtain higher positioning accuracy.
3.Dowel pins should be easy to remove. Therefore, the pinholes must be through and properly sized.
4.For asymmetric structure. Dowel pins should not be arranged on symmetrical parts. Prone to errors during assembly.
5.When lateral force is applied, do not rely only on pins and screws to fix the wedge.
6.Remove unnecessary dowel pins.
6. Correct application of standard parts.
1. Try to use standard parts when designing the mold.
2. Do not misuse the standard of standard parts.
3. The selection of standard parts for mold structural parts must match.
7.Install the lock block properly.
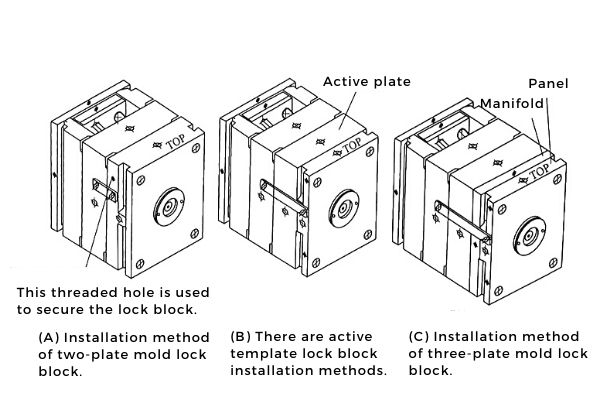
One pair of molds must be equipped with two lock blocks. Prevent mold opening during transportation and handling. Cause mold damage and safety accidents. As show the picture.
8.The mold should be provided with a mold opening slot.
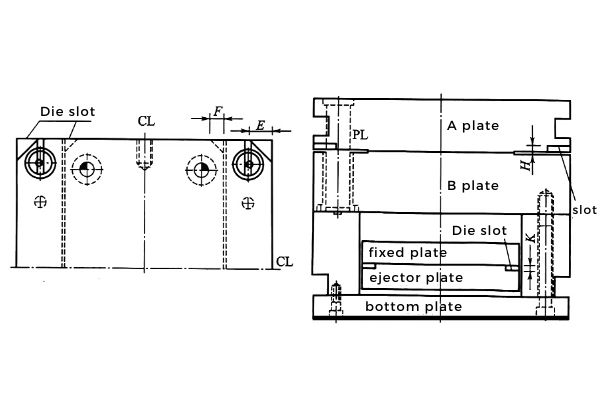
The function of the mold opening slot is to facilitate the opening of the mold. The four corners of the A plate and the B plate have grooves. Standardize the size, depth, and dimensions of the die slot. As show the picture.
9.Avoid mold lifting and placement difficulties.
1)Threaded eyelbolt holes should be provided on each side of the mold.
2)The mold should be equipped with support columns. Used to protect the core pulling mechanism and the oil cylinder. Support pillars for large molds require stepped insert form work. As the picture shows.
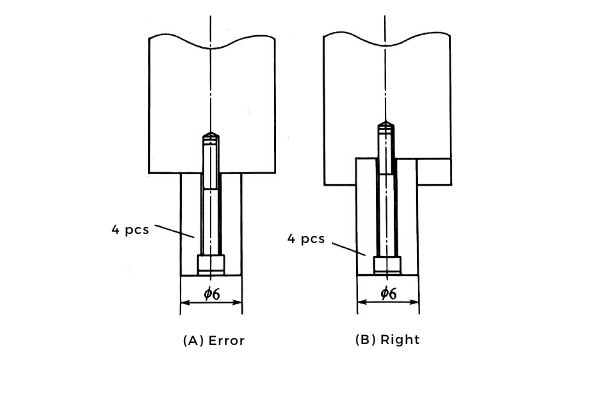
10.Strict part design.
1.Try to avoid the size of the mold to be decimal. It is wrong as shown.
2.Avoid designing parts into asymmetric shapes.
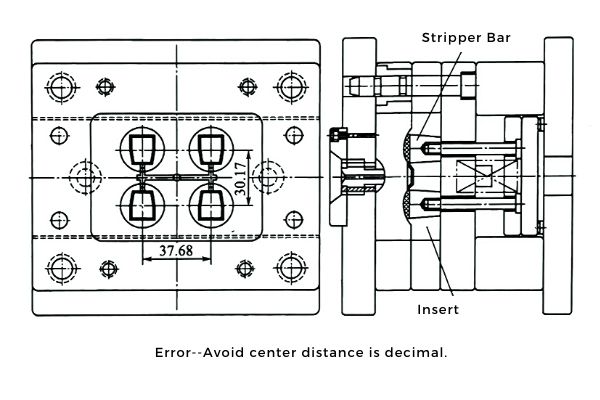
11.Design and selection of mold base.
1)The reference angle of the mold base is the right-angled edge of the offset guide hole.
2)When ordering a standard mold base, first design a 2D drawing. As the picture shows.
3) The template material should match.
4) Set the mold opening slot.
5) Pay attention to the interference of the eyebolt holes.
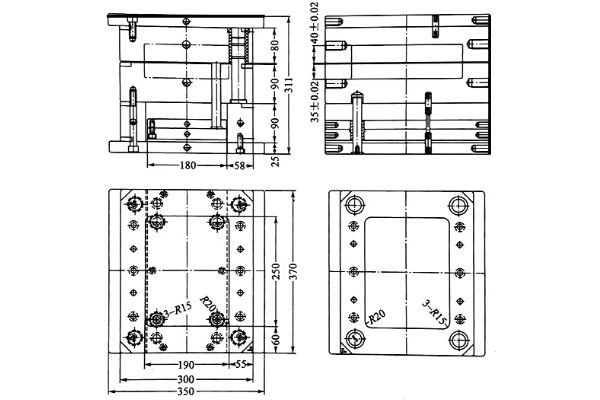
12.Surface roughness marking of parts.
1) Mark surface roughness according to quality requirements.
2) Surface roughness can be divided into: mirror smooth surface, molding surface, mating surface, non-mating surface.
3) The surface roughness marking should be compatible with the part processing method.
4) The surface roughness requirements of the core and cavity of the transparent plastic mold are consistent.
5) The surface roughness of the mold cavity of electroplated parts must be consistent.
At the end
The details about injection molds go far beyond these 12 points. Regardless of mold design and manufacturing, accumulation of experience is required. Details determine success or failure. If you have any questions about injection molds, please contact us. We are professional.
