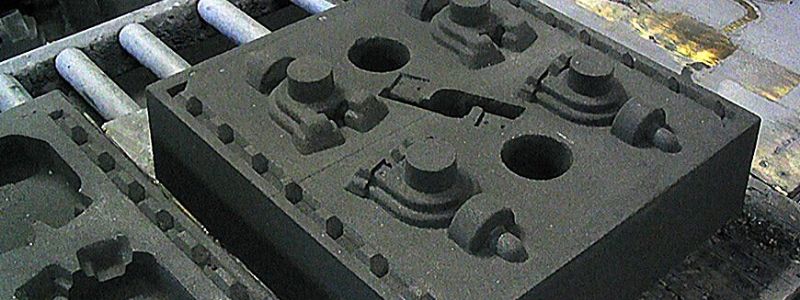
We may need metal casting molds in many field. Do you know the process of manufacturing metal casting molds?
Cutting the Sprue and the Riser
To form the sprue — a passage through which you’ll pour the metal — measure the depth of the cope, and mark this distance with tape on the side of a section of thin-walled 3/4-inch pipe. Push the pipe straight down into the sand in the cope, in a spot where it will not hit the pattern. Twist the pipe back and forth to cut an opening through the sand, stopping when the tape mark meets the surface of the sand. Use a slick to carve a funnel shape in the sand around the pipe, beveling the edges of the sprue opening. Then slip the pipe out, with the sand core inside, leaving a passageway through which you’ll pour the molten metal.
On the other side of the pattern, form the riser opening — the passage into which excess metal will rise — by using a slightly larger diameter pipe to cut through the sand in the cope.
Venting the Mold
Use a 1/16-inch welding rod or a stiff wire (a bicycle spoke is ideal) to poke channels through the sand in the cope, so that hot gases can escape. Push the rod into the sand, stopping about 1/2 inch from the pattern. Make about a dozen vents over the pattern area.
Lift the cope from the drag and set it on edge, off to one side, where it will not be disturbed.
Removing the Pattern
Before lifting the pattern from the drag, firm the pattern edge of a water-based sand mold by moistening it with a molder’s bulb or a small brush dipped in water. This will help to keep the sand from collapsing when the pattern is removed. Screw draw pins into the holes in the back of the pattern and lightly tap the pattern to loosen it from the sand. Then gently pull on the draw pins, lifting the pattern straight up and out of the casting cavity.
Cutting the Gates
Using a piece of sheet metal bent into a 1/2-inch-wide U shape, cut a channel, or gate, running from the casting cavity to the riser position. Lift out a bit of sand at a time, forming a gate slightly smaller than the diameter of the riser and slightly shallower than the depth of the casting cavity. Scoop out a similar gate from the casting cavity to the sprue position. For large molds, cut several gates to the sprue and the riser from various parts of the casting cavity. Blow out or tamp down any loose bits of sand in the gates.
Refining the Mold
Rebuild crumbled sections of the casting cavity by adding bits of moist sand, smoothing it into place with molding tools. Tamp down or blow away all loose sand to prevent it from mixing with the molten metal when the metal is poured.
Replace the cope over the drag and set the flask, still on the bottom board, in the sandbox near the furnace. If you are not going to pour the casting immediately, cover the mold to keep dirt from falling into the sprue and riser.
How to Pour Molten Metal
With a helper, lift the crucible shank and hook its safety lock over the lip of the crucible by pushing the latch forward. Lift and tilt the crucible a few inches above the mold, pouring the molten metal quickly and steadily into the sprue, or molten metal passage, into the cast. Stop pouring when the metal nearly reaches the top of the riser. Immediately, while it is still molten, pour all the extra metal into the ingot mold. Leave the casting mold in place until the metal in the sprue and in the riser is hard. To test the newly cast metal for hardness, tap it with the tongs.
How to Remove a Metal Casting
When the metal has hardened, carry the mold to the sand-storage area. Wearing gloves, separate the cope and the drag. Lift out the hot metal casting with tongs. Break apart the sand in the mold, and dump it back into the sand-storage container. Set the casting aside to cool, leaving in place the extrusions that the sprue, riser, and gates formed.
When the casting is completely cool, cut off the gates with a hacksaw and file down the rough areas. Finish the surface as desired.
